


Single Layer and Multiple Layer Images on Cricut
How To: Working with Single Layer Image and Multiple Layer Image on Cricut
Are you one of those Cricut users or Do-It-Yourself persons who have been in so many “twists” and “turns” of attempting to stretch the beauty of your design? And, of course, doing it in Cricut Design Space probably made your head spin round and round till you get dizzy! Does getting familiar with and mastering image editing features in this design application take ages before you realize you made it difficult for yourself when there is probably an easier way to do it? Awww… That’s not nice, though! It’s a hashtag--- ACTUALLY SCUFFLING!
Without a doubt, attempting to combine or dissect your image and let it play with various colors and surprises in the said design application might have cost you a redoubtable journey. This also applies most especially to how you will do it or how you should do it in your chosen designs; thus, it makes your knuckles numb too! Oh well, with the same groan everybody in the DIY community has to offer, you are not alone. Everyone experiences a similar fate and undergoes the same kinks--- It is the LAYERING of IMAGE from a SINGLE LAYER to MULTIPLE LAYERS or vice versa where the struggle is real! Take note even now, this situation still exists.
So Hear ye...! Hear ye...!
Above all other considerations, call up all the craft makers, the novice, and the pros whose melee is in the same boat! If layering images in different numbers of layers using Cricut Design Space gives you an out of the blue of “what’s next?”; “How is?” and “groping” in your canvas… Right in this blog, we will show the leisurely and most rapid way to get this all done at this same time and day! All you have to do is make sure you have enough fuel to engine your artistic mind and step on your gas pedal to arrive at this blog’s finish line! Come and let’s start!
Image Layering in Cricut Design Space: What is it?
Are you no longer happy, and would you want to break the steadiness or lameness that your design imprint is showing you for your projects? Then, you must not be afraid of giving your design a new life through Design Space’s image layering!
Layering images or cut files for design printing and cutting is a design editing feature in Cricut’s design software called Cricut Design Space. This image editing feature has different tools that can carry functionality to make a simple image into an image that you can modify and beautify by adding layers to it, becoming an image to have separable layers into a cuttable one or to be an image that can vectorize. Depending on your chosen image file type, you can do layering quickly and easily mix them with multiple colors, giving your imprint an extra dimension or lift on its edge.
Why and When should We Layer Images on Cricut Design Space?
Cricut Design Space has many excellent, convenient, and direct tools that bring magic and power to our ingenuity! Imagine how great this design application is. More than uploading or making customized images, there’s more that it can give, and thanks to its layering feature, it makes our every crafting time earn more life!
Hovering and picking up all the encouragement to empower you in trying Cricut’s design Space’s image layering, here is when and why you need it.
1. The Possibility to Creativeness
Layering image is a spectacular way to use most of any of your Cricut Machine to its optimum level! Through this feature and tool, a crafter could have a multi-layer of images for printing or cutting out multiple colors of Heat Transfer Vinyl or other vinyl types. Thus, they can affix on any base materials or substrates.
2. Hones Artistic Transformation of Images
Having images that are not just simple, plain, or in a single layer; only means you can attain the standards of design complexity in terms of imprint quality, color mishmash, and combinations of materials. Image printing and cutting will also be cozy and less messy compared to the traditional way of making customized items.
3. The Best Bound to Customize Imprints
Redressing our personally drawn images through Design Space’s image layering, without a doubt, can unleash blissful craftsmanship on our crafts! We can also do this design editing and transformation in some of our chosen images taken on the internet. However, we must be mindful that we can use any image online, such as JPG or PNG images, if subject to commercial use, which may take effect in our crafting. For such reason, depending on what purpose we will use, this type of image will limit or not limit our customization. For these situations, images we want to layer come with “copyrights” or “watermarks.” Our customization is for profitable purposes. We can only utilize these for personal use and cannot alter them without the owner’s permission unless it’s purchasable. To avoid issues or conflicts, it is better to use our own made designs or either have one that is purchasable.
4. An Inexhaustible Avenue to Image Conversion
You got images in PNG and JPG formats and think they are too plain without having much going on with them? You’ll never know that one of these days, you might want to have a 3D multi-layered artwork. Layering images can help you achieve this with your PNG and JPG images! These single-layer images will never be in the same look! Instead, they can be sleek and savvy in appearance when Cricut Design Space’s Image layering turns them into layerable images giving them a new outlook as design imprints!
The Image Files Recommended to Use for Image Layering in Cricut
As there are tons of images you can use, download, and upload on your Cricut Design Space for image layering and cutting in your cut plotters; indeed, you still want to resolve the mystery of why these files types are commonly choose and save by lots of crafters in their crafting. Visibly, even if there are still other selections of file types that Design Space Users may opt for, we will let things unfold to you by explaining why and the purposes behind the usability of these image file types for Cricut Design Space
1. The Raster Image Files or Pixels
Raster Image Files are one of the image categories we can upload in Design Space and contain formats like PNG, JPG, GIF, and BIMP, which are easily readable when used on Cricut’s design software. These are single-image layers with transparent or clear backgrounds and are idyllically utilized for drawings, logos, Icons, Digital Arts, Digital Photos, and others. Since they are made of basic images containing tiny dots, they depend on pixelation with inflexible and fixed resolution. It can be vague, distorted, or blurry if not saved at a higher resolution when stretched in any direction. On the contrary, it is mostly picked as a “Print then Cut” file or converted into full cuttable shapes for design customization on Cricut.
-
Why use Raster Image Files in Design Space, and How do they Work in this Design Application?
After a little while, it came to our mind what Raster File Images are, based on its definition or descriptions. You’re maybe puzzled as well; why use this image if there’s a possibility it won’t give us better quality? It might make us a little bit discouraged, even disappointed too.
The answer for those shady areas in you it’s not that Raster File Images are off-quality. They’re the next in line for better image quality because they’re easily readable by the design application of Cricut. Despite its mentioned qualities or being a single-layer image file, these shortcomings are handy for layering images on Cricut Design Space.
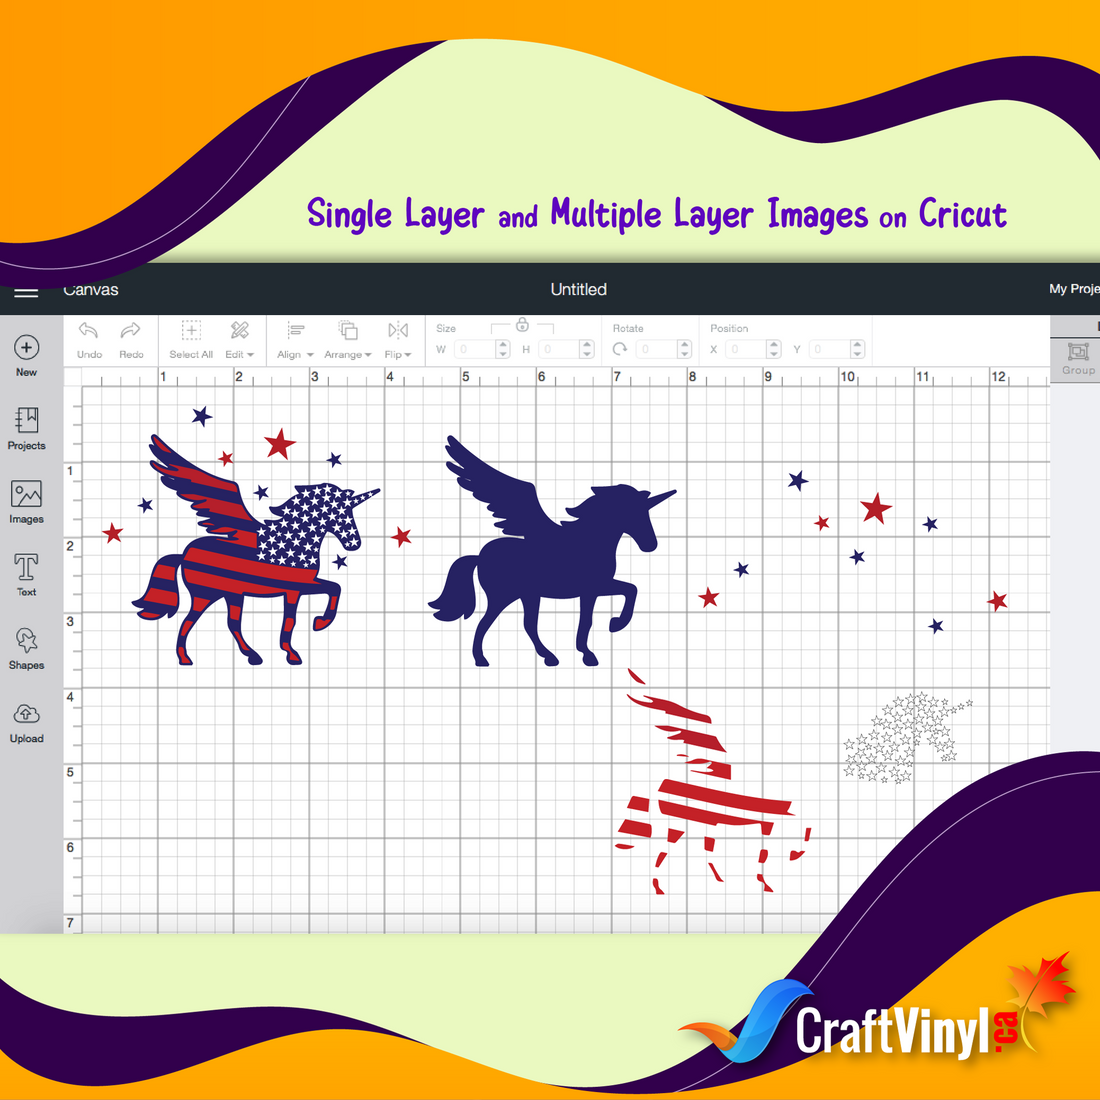
Usually, when a single-layer image file like a Raster Image is sent in design space in preparation for cutting, it appears as images without cut lines or shows as only one flat image that’s not separated as layers. But because of the powerful layering tools called Contour Tool inside Design Space, layering this image is much simpler to layer. You can unflatten it to Cut or Draw its layers first, and there you can show or hide parts of this single image layer, then select parts you want to be in multi-color or cut on different mats.
2. The Vector Image Files
Among all the image files, Vector Images are considerably the most web-friendly type of image. More than being readable files for Cricut Design Space, you can size this up to the most significant or minor size without getting pixelated, blurry, or even distorted. Vector images do not depend on pixelation because they are made of lines, points, or curves, making their image clarity so clear and precise on any angle you place it. This includes sub-file types such as .svg, .eps, or .dxf image formats that are flexible and won’t give you sweat when uploading and making layerable image files.
-
Why use Vector Image Files in Design Space, and How do they Work in this Design Application?
The answer is so simple and easy! Vector Images being three-dimensional images in nature, you can efficiently work it out on your design software and cutting machine! Once a Vector Image file is sent to the Design Space, you don’t need to go through the same process as a Raster Image File had undergone. Once they are inserted on your canvas, they are directly separated into layers and apply most of the features of layering tools on Design Space. You can group, ungroup, and assign various colors you want to appear on your imprint.
Getting Started with Layering of Image Files into Cricut Design Space
We are almost halfway through our talk with Image Layering on Cricut Design Space, and I hope that as we go along the way, our baggage of questions, things are getting lighter and more straightforward on your end. With the short know-how before diving deeper into how to turn such an image into a layerable one, what we recently introduced may equip you with this essential part.
So if you still have some kicking vibes and energy in there, send us thumbs up if you are ready for more and if you are still game to complete this journey on the same track!
A Quick Tour to Layer’s Panel before Plunging to the Steps of Image Layering
You don’t have to be a master to become a total pro in using the editing tools under the Layers Panel of Design Space. To make things easy for us later when we proceed to steps on how to layer an image, let us have a quick rundown and get to know every layering tool in Cricut’s Layers Panel in Design Space! For you to successfully operate any of these familiarizing, it is enough in the meantime. And indeed, the time will come until you get to the point of mastering this too.
1. Group
You can size or move images or texts in multiple layers altogether in the canvas or design screen without affecting its cut placement on the mat.
2. Ungroup
Move and size images or texts in multiple layers individually on the canvas and into the cutting mat.
3. Weld
It turns images in multiple layers into one shape, is irreversible, and eliminates overlapping cut lines.
4. Attach
It keeps everything on the cutting mat in a similar arrangement.
5. Detach
It separates the layers and cut or draw them individually from all other layers.
6. Flatten
It transforms any cut file in multiple layers into a printable image through the Print then Cut feature.
7. Unflatten
It parts the layers of a single printable image into separate printable layers.
8. Contour
An ungrouped multiple-layer image that individually hides or unhides cut lines within an image layer.
9. Visible Layer
An image layer is visible on the screen and will be cut, printed, scored, and written in the cutting machine.
10. Hidden Layer
This hides an image layer on the screen and will not be cut, printed, scored, or written on the cutting machine.
11. Duplicate
It creates multiple copies of a similar image.
12. Delete
It removes items and delete them on the screen.
The Layering, Breaking, Creating Image Layers, and Turning a Photo into a Layered SVG
All right! We’re good to go for turning our images into layers! Rest assured that you’re in good hands, and everything will be easy as 1, 2, and 3!
Layering Single Image to Multiple Layer and Layerable SVG on Cricut Design Space
Make a single image layer in a couple of layers or a layerable SVG in the different colors you desire… Make a single image layer or a layerable SVG into a three-dimensional design with multiple layers of different colors… Level up your design like a pro by creating your image layers using design space! Depending on the image format you choose for layering, this will require different techniques. At this moment, we gather you four ways how to make it done!
Technique 1: Adding numerous Image Layers to Single Layer Image through Contour Tool
- Import the PNG or JPG file in the Design Space. By locating the file, upload it in the canvas and select the Complex option for the complexity of your image.
- Using the background remover and the Magic Wand tool, select the parts of the image you wish to remove. Once done, the PNG or JPG file will be transformed into a vector image to be uploaded again on your canvas.
- To proceed, upload your converted image into the canvas again and duplicate it depending on the number of colors you want to apply to your design.
- Hide the part of the image you want to hide to exclude the design’s bottom or base layer to change its color. Alternately hide the layer with colors to proceed with the other layers without colors. Repeat the same process until you apply the colors to the remaining parts of the image.
- After contouring every layer, organize the layered images on the canvas and click “Make It” to choose the setting of your selected vinyl and to start the cutting.
Method 2: Separating JPG or PNG into Cuttable Layers using Background Remover and Contour Tools to Creating Multiple Image Layers
Note: This method is best to use if your image file is a cartoon, outline drawing, or three-dimensional type of image, creating multiple layers.
- On the Design Space, upload the JPG or PNG file to be directed to the background remover and to convert your image into a vector image. Then select the complexity of your design.
- Using the “erase tool” in the Background Remover, eradicate the pixels and the “magic wand” to eliminate all the colored panels. If there are no more adjustments to make, save the image as a cut file.
- Upload the converted file to the canvas and duplicate the image corresponding to the color you want to apply.
- Proceed to the Contour Tool, select “Hide All Contour” to leave the base layer with a solid image shape, and set it aside.
- Have another duplicated image of the design and select contour again. Proceed by selecting all the parts of the image you want to be in similar colors and “click off” the top layer. Repeat this process until you apply all of your desired colors, and once done, your image is now ready to go cutting!
Method 3: JPG or PNG Image File to be transformed as Cuttable Layers using Background Remove Only
Note: This technique is applied to multi-color images that don’t have an outline. To do this technique, you must upload each copy of your converted image and use the Background Remover tool to import the colors individually.
- Import and upload the JPG or PNG file to the Design Space. You’ll be directed to the background remover to convert your image into a vector image. Select “complex” for the complexity of your design.
- Using the Automatic Background Remover, your image will be left in silhouette form serving as your base layer to be imported into Design Space.
- To create an image with different shades of color, you’ll use the Magic Wand Tool and repeat that process at a time until you finish all the remaining layers and save them in the image library. Lower your color tolerance level if the Magic Wand Tool eliminates much of your image.
- To clean the excess pixels around the image, clean through Erase Tool.
- Add all the shapes in every color to the canvas. You may alter the color of each layer and assemble them again before cutting them.
Method 4: The 1 Minute Vectorization Technique of JPG or PNG file in Design Space
- Using an Image Editor with an image converter on your web browser, select the image file you want to convert after exporting the image as Vector Image on your desktop.
- Upload the image on the design space canvas, and automatically, you’ll see and have an image separated into layers containing the image’s original color.
- As simple as that, you can now cut your file!
Breaking an Image into Layers on Cricut Design Space
Breaking or splitting overlapping images or text into different parts? It’s possible to do this using the Slice Tools! Through this, you can “cut out,” “split,” or “break” an image from another shape in two layers and new paths at a time. Don’t worry either, for this is still possible to make on images with multiple layers by combining the Slice Tool Feature using the hide or ungroup feature in Layers Panel present on Design Space.
- By clicking and dragging, organize the two images you’ve chosen for them to overlap.
- Select the two images representing your two image layers at a time, and a bounding box in gray color will appear around your images, and each layer of it will be underscored in the layers panel.
- After, select the Slice Button found in the layers panel next to the Weld Tool or in the right-click menu to do the process. When the images are split out, you can edit the layers individually to change their colors and remove any unnecessary part of the image that you will not use for designing.
Discover More Great Articles On Crafting
Click the links below for more articles about vinyl crafting:
CRICUT HACKS, SHORTCUTS, AND HIDDEN FEATURES
VINYL PROJECT IDEAS FOR THE FALL SEASON
HALLOWEEN DECOR IDEAS FEATURING DIY WITH VINYL
Erase all the doubts and embrace the possibility of turning your image into an image full of life! With your senses’ full cooperation and involvement, transforming your pictures into a layerable cut file is an excellent step for you and your design to leap into higher-quality masterpieces! With that, good job for your patience and creative understanding! You have made it till the end, and guarantee everything under the horizon of Cricut Design Space’s Image layering will come running after you!
Learn more Vinyl tips and tricks and share your crafting adventures with us. Please visit us on our pages.
Social Media Accounts:
FB: CraftVinyl.ca
IG: CraftVinyl.ca
TikTok: craftvinyl.ca
For your vinyl crafting needs, please check our website at www.craftvinyl.ca. We offer different Adhesive and Heat Transfer Vinyl, perfect for your next project.


