


SISER STRIPFLOCK HEAT TRANSFER VINYL

ALL ABOUT SISER STRIPFLOCK HEAT TRANSFER VINYL
Are you looking for a vinyl that will give your design a little something extra, such as volume, dimension, and uniqueness? What about a colorful vinyl that adds the look of embroidery without the hassle of setting up your embroidery machine? Worry no more! Siser StripFlock Heat Transfer Vinyl will quickly get you there!
Siser StripFlock is a fuzzy, flocked material with a distinctive texture that gives your designs a great look. You can use StripFlock to simulate a satin stitch around other heat transfer vinyl materials, print and cut materials, and use it as the primary material in your design. Another good thing about this vinyl is that it has a nice suede-like feel to it. StripFlock is a raised and textured alternative to embroidery that will give any style a high-end, rich appearance. StripFlock is perfect for animal prints and layering on top (or under) other fabrics because of its deep, accurate colors.
BASIC PARTS OF SISER STRIPFLOCK HEAT TRANSFER VINYL
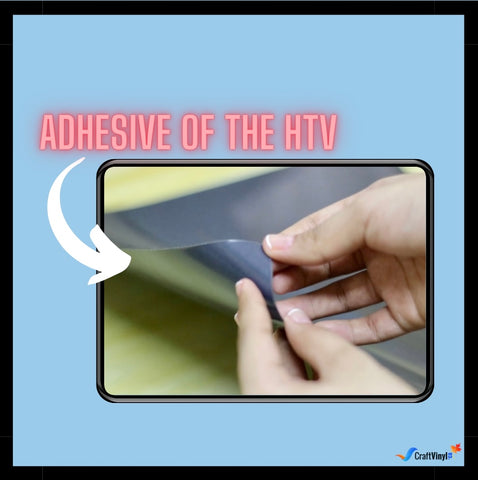
First, let's go through the basics of StripFlock Vinyl, which is made up of three layers. As you can see, the first portion on this vinyl, which is very shiny, is what you call a clear carrier sheet. This sheet, which is thick plastic, is the front part of the vinyl.

Behind our plastic carrier sheet, there's our StripFlock vinyl, which will peel away from our carrier sheet. Here is where the velvety soft finish can be found.

Then there's our adhesive on the back, which isn't activated until it comes into contact with the heat.
Note: When dealing with Heat Transfer Vinyl, avoid using lotions or creams because they can interfere with the adhesive and reduce the durability of the vinyl.
HOW TO USE SISER STRIPFLOCK HEAT TRANSFER VINYL?
When you start working with Siser StripFlock Heat Transfer Vinyl, you might think it's a little complicated to use. But, if you get the hang of it, using StripFlock HTV isn't that hard, and you would probably enjoy doing it.
Siser StripFlock vinyl is a decent option if you want to make several fancy designs. We may use smooth vinyl to layer it. Lay a sheet of soft vinyl and heat press it, then add a layer of cut StripFlock vinyl and heat-pressed it.
Furthermore, with the Siser Stripflock, you can also layer one sheet of Siser StripFlock vinyl on top of another to make multi-color designs.
But first, let's look at how you should use Siser StripFlock Heat Transfer Vinyl.
1. How to cut the Siser StripFlock Heat Transfer Vinyl?
When cutting the Siser StripFlock Heat Transfer Vinyl, it is like usually cutting a Heat Transfer Vinyl. You want to cut through the adhesive and the actual Stripflock material while cutting Stripflock vinyl, as with all heat transfer materials. However, you don't want to cut through this transparent carrier sheet because it serves as transfer tape.
To cut your Siser StripFlock vinyl, you will need a vinyl cutting machine. It's also worth noting that Siser StripFlock vinyl usually requires a deeper blade depth than most smooth heat transfer vinyl.
However, it varies depending on the different manufacturers. On their packaging, they will most likely have instructions for cutting requirements. Also, it depends on what cutting machine you will be using.

That being said, we'll be using a Cricut Explore Air 2 with the Iron-On Plus setting. You can always do a re-cut from the machine if you cut your vinyl and discover it didn't cut through correctly. We never had a problem with the settings when we used this method.
Note: It is better to test the cut before proceeding with the cutting process.
After cutting your preferred design, you can weed and peel it as you usually would to prepare it for application. Since StripFlock is thicker, better use a broader, more vital weeding tool. It will make the weeding process a lot easier and faster.
2. How to Iron or Heat Press Siser StripFlock Heat Transfer Vinyl?
First, read the notes that came with the vinyl you acquired. Each brand is unique and will usually tell you what temperature and time settings you will need to apply the vinyl.
When pressing the vinyl on your final substrate, you can use an iron or a heat press. But it is better to use a vinyl heat press for the Siser StripFlock is a special vinyl.
Before laying it on the cloth, remember to do an initial press with the final substrate. This press will get rid of any moisture on the fabric as well as wrinkles.

Set the temperature to 320 degrees Fahrenheit and gently press for 15 seconds. Check the edges to see if the entire vinyl adheres; if it lifts, try using more heat and pressure.
You can use the same steps when using a household iron, but you must set it to 'cotton' or 'high.' Before moving on to the next portion of your design, apply pressure for 20 seconds.
Be sure to follow the vinyl instructions on whether to peel the plastic when it's cold or hot. When peeling the Siser StripFlock vinyl, peel it when the plastic is completely cool.
There you have it! Now we are all done. It's truly a fun process! We hope that this was educating for you! If you have more inquiries, you can send a message on our social media accounts, and we'll try to answer them! In case you try this, we'd love to see them! You can also send them to us via private message on our social media accounts. Also, check out our website! We offer different types of adhesive vinyl and heat transfer vinyl at a very affordable price!
Social Media Accounts:
Facebook: CraftVinyl.ca
Instagram: @craftvinylca
TikTok: CraftVinyl.ca
Thank you, keep safe, and stay crafty, Crafters!


