


Adhesive Vinyl Application on Mugs

Adhesive Vinyl Application on Mugs
Adhesive vinyl is something you can put on almost everything with smooth and nicely finished surfaces. One of the keys to a successful Adhesive vinyl project is having a clean and smooth final substrate. And MUGS is one of the examples; it's a final substrate where you can easily apply vinyl. Even if you are a beginner, I'm sure you can perfectly accomplish adhesive-on-mugs projects!
But, there are two factors that we have to consider first before we apply the vinyl to our mugs. It's pretty important not to disregard these factors for you to have an excellent final product!
Two Factors to Consider Before Crafting
1. In choosing the design (Size, Thickness, etc.)
In deciding on what design to choose, we need to consider a few factors: the size, thickness/thinness, and the design details. For the sizing of the design, it's essential to make your design not too big for the mug to handle. The smaller your design, the easier it is to apply. If the design is too big for our cup, there's a tendency that it will be crumpled or wrinkled.
It is also better to choose a thick font style and not too thin. When we use font styles that are thicker/fatter, the application process will be a lot easier. Slimmer font styles are difficult to apply because of the delicate and thin "swirly" lines. These soft lines are easier to tear apart even before applying them to the final substrate. But if you've decided to use a thinner font style, it's okay! We must be careful when handling the design to prevent it from breaking apart.
And the last thing we must consider in our design is the tiny details it may contain. For example, the dots at the top of the small letter I these little details can be easy to lose when applying the vinyl. So we have to keep an eye on them. We have to check if they are still present from time to time.
2. In Choosing the Mugs
There are different mugs, and we want to choose pretty straight and straight ones. Straight mugs are the ones that are perfect when you are applying Adhesive Vinyl to them; it's easier to use because it doesn't contain any curve to it. When choosing the mugs, the straighter the mugs, the easier the application process will be.
Some mugs are pretty straight at the top but slightly narrow down at the bottom. This type of mug can also be perfect for vinyl application but is not as perfect as the straighter ones.
And then there are the tapered mugs. Tapered mugs are the mugs that narrow a lot down at the bottom. These mugs aren't ideal for vinyl application but are not impossible. When we use tapered mugs, we have to work on our design on the more narrowed part of the mug to avoid wrinkling the design. It's more challenging and confusing to work with than the other mugs, but possible.
And now that we know the two factors to consider let's go ahead and do this Adhesive Vinyl on Mugs Project!
Step-by-Step Guide in Applying Adhesive Viny on Mugs
Step 1: Prepare the Design
We can prepare our design with any software/application we have or where we are most comfortable using it. We have to ensure that we've correctly taken the proper measurements, and then we'll adjust the size of our design according to the measures we've taken earlier. It's vital to have the right size for our design; this will help us avoid any wrinkles on our final product.

Step 2: Prepare the Final Substrate (Mug)
In this step, we'll have to prepare our mug by cleaning it thoroughly. We'll wash it like we usually wash it, with soap and water. Rinse it well, then let it dry until all the moisture is out. We can use paper towels when drying it out, but it's best to let it air dry to prevent tiny fibers from entering our now cleaned substrate. When it's all dried out, we'll clean it one more time with cotton and rubbing alcohol. Rubbing alcohol can help remove any remaining dust and crease from our mug. When it is all cleaned, we must be careful and try not to touch the area where we will apply the vinyl to prevent it from collecting oils again. Our fingers contain natural oils that can be transferred into the mugs.
Step 3: Cut, Weed, and Apply Transfer Tape
Check the settings and make sure that the suitable material is in. And then send it to cut. Weed out the unnecessary parts of the design. The design should look how it should be after weeding all the unnecessary details out. And then, apply the transfer tape, and scrape the design onto the transfer tape to ensure that it is properly transferred onto the transfer tape.

Step 4: Apply the Adhesive Vinyl onto the Mug
Tear and remove half of the paper backing from the left side or top part of the design, carefully stick it onto the mug, and scrape it using the application tool. And then, carefully remove the other part of the paper backing and burnish it. This step is the most crucial part of the process; we'll take time doing this.
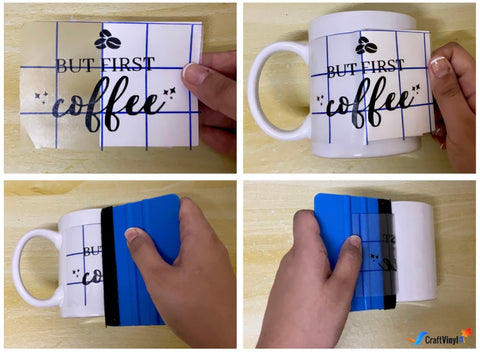
Make sure to scrape all the design areas and then carefully remove the transfer tape. This application method wherein we tear off half of the paper backing, stick it into the final substrate, remove the other half of the paper backing and then burnish it one more time is called the hinge method. This method is perfect for a project that includes non-flat surfaces like mugs and comprehensive designs like wall decals.
Step 5: Curing
After successfully transferring the design to the final substrate, we let it cure for 24-48 hours. Curing is a step wherein we allow the project to rest without doing anything to it for at least 24-48 hours. This will help the vinyl to activate and adhere to the mugs fully.
Note: we don't recommend using a dishwasher to wash the mugs with vinyl. There's a chance that the heat from the dishwasher might peel the vinyl off the faces. That's why as much as possible, handwash the mugs to prevent the design from getting ruined.

And that's it! We're done! Applying Adhesive vinyl on mugs is an easy and simple task! If you do try it, we'll be delighted to see it, you may send it to us thru private messages on our social media accounts, and we'll showcase it on our feed! Don't be afraid to try it; it'll be worth it!
Social Media Accounts:
FB: CraftVinyl.ca
IG: craftvinyl.ca
Shop for your crafting supplies in our store! We offer various Adhesive Vinyl, Heat Transfer Vinyl, transfer tapes, and many more! Check them out by clicking this link below!
Website: Craftvinyl.ca
And thanks for reading this article. We hope it was pretty helpful! Stay safe and crafty, Crafters!


