


HOW TO STORE ADHESIVE VINYL AND HTV
IDEAS ON HOW TO STORE ADHESIVE VINYL AND HEAT TRANSFER VINYL
If you have a cutting machine, you are most likely to have vinyl too, and we understand hoarding vinyl is entirely regular. But have you gotten to the point that you don't know how to store your vinyl? Do you feel like drowning in vinyl rolls? Are you having trouble finding your preferred vinyl for your project? Do you spend more time searching for your vinyl rolls and tools than crafting? It's time to organize your vinyl!
We can all be messy crafters, but we've discovered that keeping our craft rooms tidy has helped us stay sane and let us craft more. In this blog, we'll go over a few different ways to store your vinyl rolls properly. So please continue reading and learning from us!
Before organizing your vinyl into their storage, let us learn first how we can quickly store your vinyl.
STEP 1: REMOVE AND SORT THE VINYL FIRST
The first is to sort and remove the vinyl in their respective places. Doing this will make it easier for us to store it properly and know a better way to organize it. It will lead us to see what kind of color and type the vinyl is if it is an adhesive or heat transfer vinyl. Suppose it is a special vinyl or just a regular vinyl.
STEP 2: RE – ROLL THE VINYL
Re-rolling vinyl will take some time, but it could save a lot of time in the long run. First, we can get rid of the cardboard tubes and save space. Second, combining the same color rolls may be possible, freeing up even more space. This step only applies to vinyl you will eventually roll up.
STEP 3: REMOVE THE UNNECESSARY
Get rid of those tiny scraps you don't need when sorting and re-rolling the vinyl. Also, please dispose of the cardboard tubes inside vinyl rolls as they take up too much space.
STEP 4: ARRANGE THEM AND LABEL
Once you are all done sorting and removing unnecessary things, it is time to label it. Labeling will help you to know what vinyl you have and will help you to organize it quickly.
After knowing what type, color, category, and kinds of vinyl you have, you can now proceed in organizing it. These ideas that we will provide depend on your preference. So, let's go!
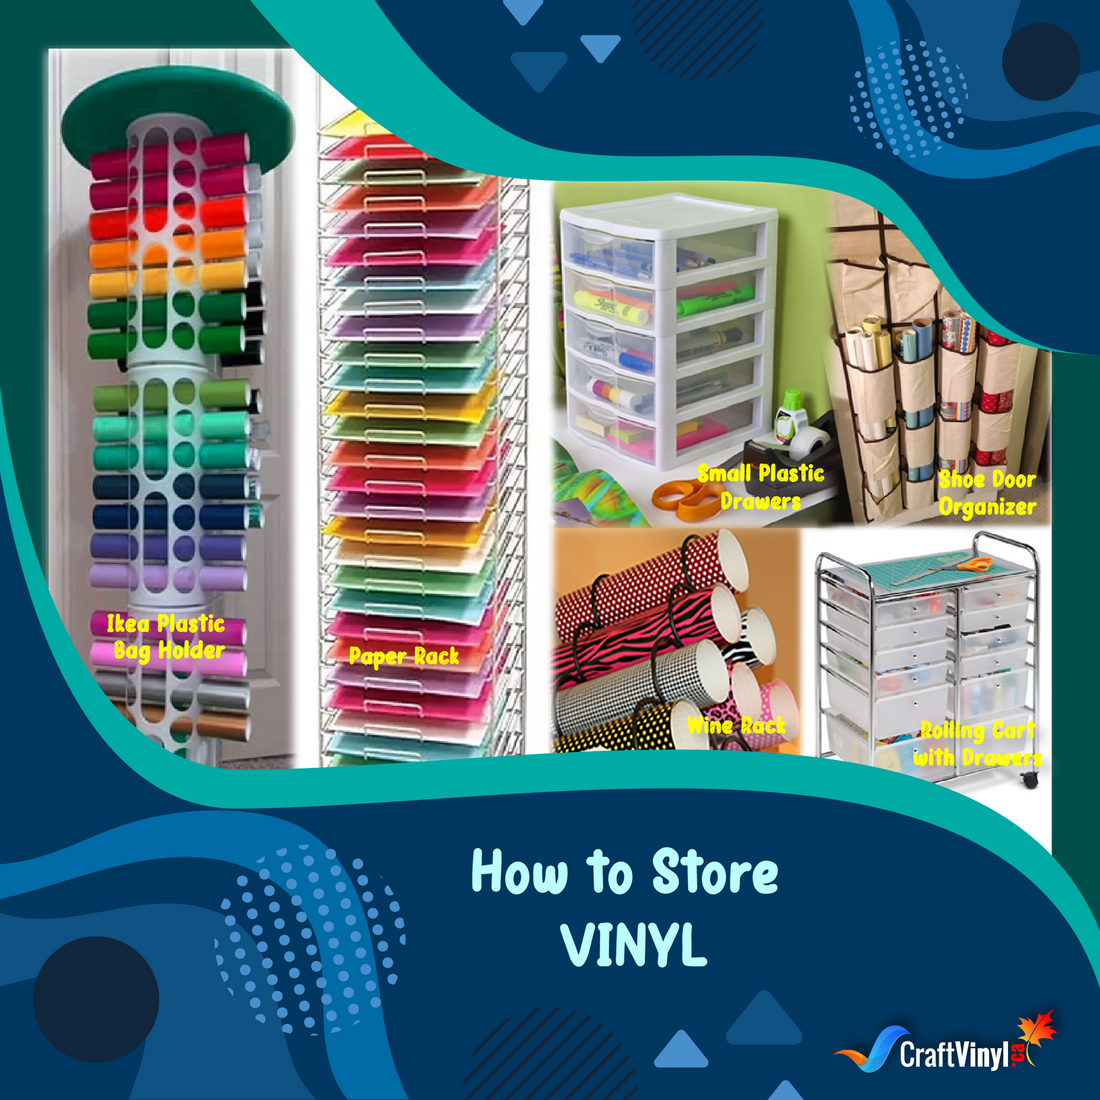
1. OVER THE SHOE DOOR ORGANIZER
This choice is ideal for crafters who need a fast fix. It has an average of 24 compartments to hold a wide range of colors. Roll all the same sheets and the stain facing out, so you don't have to search for what you need.

There's a hook on this one, too. It can store a variety of sizes and colors and hang right on your front door. It's excellent for adhesive vinyl, so you can roll your sheets loosely instead of tightly to avoid wrinkles. As a result, this is a great storage solution that doesn't take up a lot of space.
2. IKEA PLASTIC BAG HOLDER
This hack has been around for a while, but I still think it's brilliant. IKEA plastic bag holders are currently the most common choice for quickly storing your Heat Transfer Vinyl sheets. This item is highly flexible; you can leave it on a table or hang it on the wall. With this, the colors are easy to locate, so you can start crafting immediately.

3. ROLLING CART WITH DRAWERS
I would suggest a closed cabinet that rolls for those who have more floor space to work with! It is a perfect piece of furniture that you can quickly transfer around the room for those who often reorganize their craft room daily. Arrange the vinyl on each shelf by category or color and label the outside with your adhesive vinyl.
You can store vinyl rolls, crafting tools and supplies, and your cutting machine in one compact box on carts like this. You can just put some labels to remember what category or kind of vinyl you store in the drawer.

4. PAPER RACK
There are various storage options for paper, but you can also store your vinyl. It's great storage for the vinyl you wish not to have wrinkles or those you don't want to roll up. These can be used for 12 by 12 vinyl sheets. It is a fantastic way to display vinyl because it lays flat.

5. SMALL DRAWERS
Of course, once you are a crafter, you can't get rid quickly of your scraps. Even if it is already tiny vinyl, you will keep it. So, for you to store your leftovers in a small drawer is a good organizer for this. It is versatile because you can store crafting tools like blades, weeding tools, and many more.

6. STANDING SHOE RACK OR WINE RACK
There seem to be a variety of shoe and wine storage available, all of which are ideal for displaying vinyl. The square slots are suitable for storing rolled vinyl and make it easy to see the colors again.

And there you have it! These are some excellent ideas for storing your Heat Transfer Vinyl and Adhesive Vinyl! I hope these inspire you to start organizing your craft room and save space! You may choose what will suit you in your craft room and where you will store your vinyl. I wish these ideas helped you think of new ways to arrange all of your crafting supplies so you can spend even more time crafting!
If you are a crafting enthusiast, follow us on our social media accounts to see some tips and tricks for adhesive vinyl and heat transfer vinyl!
Social Media Accounts:
FB: CraftVinyl.ca
IG: CraftVinyl.ca
TikTok: craftvinyl.ca
For your vinyl crafting needs, please check our website at www.craftvinyl.ca. We offer different Adhesive and Heat Transfer Vinyl, perfect for your next project.
Thank you, keep safe, and stay crafty, Crafters!
Learn more Vinyl tips and tricks by clicking the links below:
TIPS AND TRICKS WHEN WORKING WITH HTV PART 1
TIPS AND TRICKS WHEN WORKING WITH ADHESIVE VINYL PART 1


