


CRICUT DESIGN SPACE: A MUST-HAVE SOFTWARE
CRICUT DESIGN SPACE: A MUST-HAVE SOFTWARE
Hey there crafters! We know that crafting is an enjoyable hobby anyone can do. Many are getting into crafting, yet they don't know how materials work, so you have to learn it first to produce awesome vinyl projects!
One of the requirements in crafting is having a design application or software to design your vinyl. It is a must if you work with any heat transfer vinyl, including standard HTV vinyl and printable ones. Your imagination is your limit with Cricut design space! With design space software, your creativeness in design is possible.
Let's first discuss the meat of this blog. Let me introduce what Cricut Design Space is.
Cricut Design Space is a design app that works with a Cricut electronic cutting machine. It is the must-have software you will need to use your Cricut, whether you are a long-time Cricut user, a beginner, or just thinking about getting one.
Design Space includes a collection of tools for creating, modifying, and personalizing your Cricut projects. It also contains a large image, font, and pre-designed project library. Furthermore, it is a digital design application for setting up and laying out projects for use with a Cricut machine. The app is available on various desktop computers, tablets, and mobile phones, including iPhone and Android. Currently, you can't use Design Space on your Chromebook. Sorry Chromebook users.
Below is a quick Cricut Design Space guide to assist you in opening the box and getting started with your Cricut journey! Keep on reading, crafters!
Design Space for Cricut: Feel Free To Choose Your Designs!
There is some question about whether or not Cricut Design Space is genuinely free. People purchase a new Cricut machine, such as the Cricut Maker or the Cricut Explore Air 2, receive a free Cricut Access trial, and then discover that they must pay to continue using their designs. If you don't know this, it is pretty frustrating!
So, is design space for Cricut free or not?
Let's clear this one.
Cricut Design Space is a free piece of software that connects to any Cricut cutting machine. It allows users to freely upload an unlimited number of designs and files to the program. However, some of the images and fonts in Design Space must be purchased. It can be quite puzzling! You must pay to continue using projects created in Design Space that contain images from Access. If you no longer wish to pay for Access, you can still use Design Space by utilizing their free designs or creating or importing your own.
I hope I have cleared this matter for you.
DESIGN SPACE FOR DESKTOP: EVERYTHING YOU NEED TO KNOW
Now that you know that Design Space Software is a significant investment in crafting, you'll probably ask, "Is Cricut design space available on PC?" I want to give you a precise answer to this question.
Let us first differentiate the operating system in different kinds of a desktop so you'll have a choice for the one you have, don't worry, I got you!
Design Space is free software that works with Cricut intelligent cutting machines. You can use it with Windows, Mac, iOS, and Android devices. The application's current minimum system requirements are listed below.
Important: Design Space is not supported on Chromebooks or Unix / Linux Computers.
For Windows OS
|
Operating System
|
Internet
|
Offline
|
|
-Windows® 10 or later*
-CPU: Intel™ Dual-Core or equivalent AMD processor
-RAM: 4GB
-2 GB free disk space
-An available USB port or Bluetooth connection
-Display:Minimum 1024px x 768px screen resolution
|
|
· Available for Design Space for Desktop
· Memory needs will vary based on usage
|
For Mac OS
|
Operating System
|
Internet
|
Offline
|
|
-macOS 11 or later*
-CPU 1.83 GHz
- RAM: 4GB
-2 GB free disk space
-An available USB port or Bluetooth® connection
-Display: Minimum 1024px x 768px screen resolution
|
|
· Available for Design Space for Desktop
· Memory needs will vary based on usage
|
For IOS Devices
|
Operating System
|
Internet
|
Offline
|
|
iOS 14.5 or later
|
|
· Available for iOS devices
· Memory needs will vary based on usage
|
For Android Devices
|
Operating System
|
Internet
|
Offline
|
|
-Android 9.0 or higher
-Mobile devices and tablets only
-Chromebooks not supported
|
|
· Not currently available
|
That's the tea! If your desktop has these system requirements, I could say yes! It is available on your desktop!
QUICK TUTORIAL FOR DESIGN SPACE 2022
Do you want to learn everything about Cricut Design Space but don't know where to begin?
Let's be honest: at first, learning a new hobby or skill can be intimidating yet exciting. We don't always know where to begin because there is so much information, and it can be overwhelming. As I mentioned earlier, you must learn your materials for your vinyl project, including Cricut Design Space. I bet you can't live without it in doing your vinyl projects.
So, we're going to answer this exciting question now!
How to use your Cricut Design Space 2022?
Before we get started, let's define the Cricut Design Space canvas area.
The fun starts at the Cricut Design Space canvas area before you cut your projects. Design Space is where you can refine and organize your work. You can use and upload your fonts and images in this space, but you can also use Cricut's premium images and fonts through individual purchases, Cricut Access, and cartridges.
Now that we've gotten that out of the way let's get started!
There are so many buttons, options, and things to do that you may get baffled. Don't worry; I'll be here to guide and motivate you!
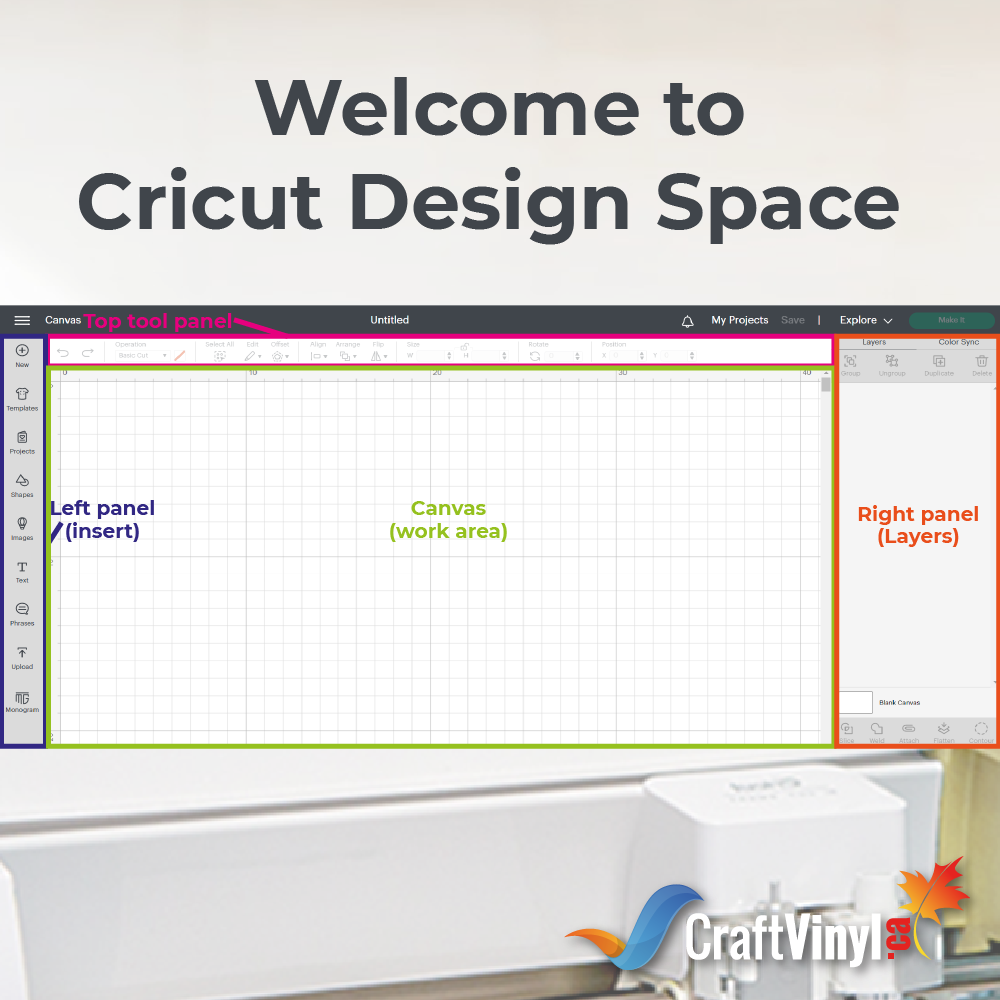
In this tutorial, you will learn what EVERY SINGLE ICON stands for, and to keep things organized and simple, we will divide the canvas into four areas and colors.

Top panel (PINK) – Editing area
Left panel (BLUE) – Insert area
Main canvas (GREEN) – Main work area
Right panel (RED) – Layers panel
TOP PANEL
The top panel (pink) in Design Space is where you will edit and arrange elements on the canvas. You can:
- Choose your font type
- Change the size of objects
- Align or distribute objects
- Rotate objects
- Save your project
- Hit the "make it" button
- And more
These Cricut Design Space tools all have distinct labels. If unsure about a tool, you are welcome to experiment with a shape or reread this post.
You can access all of your account information, machine information, calibrations, a preferred materials list, etc., using the three bars on the left of the screen or the Toggle Menu. There is a great deal to explore here. Listed below are the tools for Editing Area.
NAME OF PROJECT
It will always say "Untitled" when you start a new project because you haven't given it a name or saved it. It is a blank, similar to a Word document or a Google Doc.
OUR PROJECT
You can access any project you've previously created or saved by clicking this link. Here you can delete projects that didn't work or are not in need in the future.
The great thing about this section is that if you choose to recreate an item, all of your design elements will be saved and available for use. There's no need to start over on the project or the wheel.
SAVE
Once you have placed something on your canvas, this option will become available. It will remain grayed out until you are ready to add a design element. You should regularly save anything you design or work on.
Design Space is entirely cloud-based, but DO NOT rely on it to save your work for you on its own. Like any technology, it will fail when you least expect it.
MAKE IT!
Click the MAKE IT button once you've finished making changes to your design and defining the cut and score lines. Your machine will then guide you through loading your mats and completing your cut project.
LEFT PANEL OF THE CRICUT DESIGN SPACE - SHAPES, IMAGES, AND TEMPLATES
You can start a new project, browse older ones, and locate designs and photos to edit and create from in the panel on your left-hand side.
Let's begin at the top and move downward.
NEW
Click to create or replace an existing project on the canvas area.
TEMPLATE
To view how your design would appear on the material, browse for templates in this area.
NOTE: The template itself won't be cut out; it is merely provided for your use to aid project visualization. It is, in essence, a mock-up of your design.
PROJECTS
It is a window displaying your previously created or saved projects. It is helpful if you need to redo a project and keeps you from starting from scratch.
A drop-down menu lets you select a project from the Huge collection of Cricut projects. You can discover:
- Coloring pages
- Free projects for different machine types
- Ready to do projects
- Cards
- Projects for baby
- And much more!
This is where you should look for inspiration if you want to be creative but are stuck on ideas for projects to make.
Projects that are accessible with Cricut Access are indicated by a "Green A." Additionally, you can add projects to your favorites list and return to it whenever you're prepared to design anything.
TEXT
When you wish to add type to your canvas, choose this tool. After selecting the text button, begin entering in the tiny window that appears on your canvas.
SHAPES
The only thing limiting you is your creativity! These are the primary shapes. These can be used as basic building blocks or combined with other materials to create intricate artwork.
SCORE LINE
Using the score line feature, you can add a line to your design and have your machine score it for folding. Use this function for any paper art where scoring lines are required for complex folds.
UPLOAD
It's the program's most fantastic choice! Any image in any format can be uploaded and used to build your projects.
CRICUT DESIGN SPACE CANVAS AREA
You can see all the elements and objects that go into your project in this area, the main design area.
Use the tools and features listed below to modify your design and prepare it for cutting, sketching, or scoring by selecting design features.
RULERS & GRID FOR CANVAS
By clicking the TOGGLE button in the top left corner and then choosing SETTINGS, you can convert measures from inches to centimeters. All your available options for the design space will appear in a new window. Set it up in a way that suits your creativeness.
SELECTION
Look at the blue bounding box surrounding the object to see your chosen layers. Each of the four corners has a unique method for changing the selection. You can also edit or manipulate an object while it is selected using the Cricut layer attributes panel, which is located on the right.
EDITING MENU
The main course of this menu is what makes this program run. You may modify, arrange, resize things, and do much more here. This menu operates the majority of your canvas area.
CRICUT DESIGN SPACE RIGHT PANEL – LAYERS AND MORE TOOLS
Let's discuss layers once more in case you only glanced over the information above. Layers should be thought of as glass for the most satisfactory results (or transparency). A complete image is created by layering every piece of glass in a frame.
You can focus solely on a particular design layer using a design tool like Cricut Design Space. To display your finished design, you can alter it, reorganize it, and then place it back in the stack.
GROUP, UNGROUP, DUPLICATE AND DELETE
You'll use these tools to move things around on the canvas. They will help you save time and maintain the placement of objects concerning other objects.
LAYER ATTRIBUTES
The layers panel's elements each have a corresponding attribute. It has either a CUT, WRITE, SCORE, or PRINT designation. You can view the shape's current properties to the right of the design in the layers panel.
You can modify these attributes by choosing the element, selecting the LINE TYPE option, and then choosing your desired action.
BLANK CANVAS
This option allows you to alter the canvas' color. Use this option when you have a template on your canvas and want to see how your design will appear in various color schemes. Additionally, you can use this to determine whether a design's edge has a white sticker shadow or not.
CONTOUR
Applying the contour tool, you may conceal undesirable elements. These are the elements of the design that you want to cut or that are unnecessary.
Did you enjoy our quick tutorial? I hope I tour you in Cricut Design Space!
DOWNLOAD AND INSTALL DESIGN SPACE
After learning the parts and elements of your design space, it is also a must to learn how you will download and install it. Your dream designs would not be possible if you didn't have design space software!
You may download Design Space on your iOS or Android device and your Windows or Mac PC. Below are the suggested minimum system requirements.
For MAC
To download, install and launch Design Space for Desktop for your Mac computer:
1. Open an internet browser and navigate to design.cricut.com.
2. Select Download. The screen will change as the application file is downloaded. It will look different in every browser.
3. When the download is complete, double-click the .dmg file in the browser or your Downloads folder.
4. Drag the Cricut icon to the Applications folder icon to begin the installation. Design Space for Desktop automatically gets added to your Applications folder.
5. To launch Design Space for Desktop, double-click Cricut Design Space in your Applications folder. To create a shortcut, drag the application to your dock.
6. A Mac notice may appear to ask if you want to open the application downloaded from the internet. Select Open to continue.
7. Sign in with your Cricut ID and password.
8. Enjoy using Design Space for Desktop!
For IOS:
Instead of using your device's web browser, you can utilize Cricut Design Space as an app on compatible iOS devices. Please use the steps listed below to download the Design Space iOS app.
1. Tap on the App Store icon on your iOS device home screen to open the App Store.
2. search for Cricut Design Space. The Cricut Design Space app appears as a white square with a green Cricut "C" logo in the center.
3. Tap the Get button to download the app, and verify the download with your iTunes password if prompted to enter it.
4. Once the download is complete, the app will launch and display options for completing the New Machine Setup or proceeding to the App Overview.
5. If you do not wish to do either, simply tap the "X" in the upper right corner to get to the landing page, sign in, and start designing on the go!
For Android:
Instead of using your Android device's internet browser, you can utilize Cricut Design Space as an app. Use the instructions listed below to download the Cricut Design Space for Android.
1. Tap the Google Play Store icon on your device's home screen to open the Play Store.
2. Search for Cricut Design Space. The Cricut Design Space app appears as a white square with a green Cricut "C" logo in the center.
3. Tap the Install button to download and install the app.
4. Once the installation is complete, the app will appear on your App Home Screen.
5. Simply tap on the icon to open the app, sign in, and start designing on the go!
For Windows:
Follow these simple steps to download, install and launch Design Space for Desktop for your Windows computer:
1. Open an internet browser and go to design.cricut.com.
2. Select Download. During the download, the screen will change. It will be a little different with every browser. Google Chrome is used in this example.
3. When the download is complete, double-click the file in the browser or in your Downloads folder.
4. If a window asks if you trust the application, select the option to trust the application.
5. A setup window displays the installation progress.
6. Sign in with your Cricut ID and password
7. A Design Space for Desktop icon automatically gets added to your desktop screen. Right-click on the icon and choose Pin to Taskbar or drag the icon to the Taskbar to pin the shortcut within easy reach.
8. And that's it! You can now enjoy Cricut design space on your desktop.
Things to Remember:
1. The app remembers your sign-in. Unless you signed out of the previous session, you would not need to sign in each time you launch.
2. The app remembers your sign-in. Unless you signed out of the last session, you will not need to sign in each time you launch.
TROUBLESHOOTING CRICUT DESIGN SPACE
You've come to the right place. If you've ever been working on a project in Cricut Design Space, something isn't working the way you intended it to. While working on your design space, you may receive a warning or an error you do not understand. You will see some tips on troubleshooting and fixing issues in Cricut Design Space here. I'll review some of the most specific signs, explain their meaning, and how to resolve the problem so you may resume crafting.
1. Layers Panel – Cut or Print then Cut
Crafters who genuinely understand how Cricut Design Space functions will always want to see their screen in Design Space, especially the Layers Panel on the right-hand side. I notice a lot of people asking for guidance online. Why is that so? Because there is a wealth of knowledge in that Layers Panel that can assist you in troubleshooting Cricut Design Space, you can use it in your favor.
The distinction between a print-then-cut project and a cut-alone project is HUGE. For instance, you can see that I have two hearts on my Design Space canvas in the image below. You can notice that one heart says Cut next to the small preview if you look at the information in the layers panel, which I have circled in blue. It indicates that the image is prepared for Cricut cutting. The second heart is set up to Print then Cut image because it says Cut / Print. It will be printed on our printer before being cut out with the Cricut.

Always decide before you begin a project whether you want to cut the picture directly from your Cricut or print it from your home printer and then cut that.
2. Layers Panel – Warning Icon
Searching for the warning icon is another step when troubleshooting in Cricut Design Space. This icon warns that there is a problem or error with your layer. You may see a yellow triangle with an exclamation mark inside of it.
Make sure to read the details contained in these mistakes. I'll explain what they all signify in the parts that follow. If you click on that yellow triangle, you can learn more about the error and use that information to troubleshoot in Cricut Design Space.
3. Limits on size
The limitations of the Print then Cut and the Cut only image types differ. For instance, the image's size can result in a mistake. You can cut the image size up to 11.5 inches by 23.5 inches. It is because Cricut only manufactures cutting mats up to a length of 12 inches by 24 inches, and Cricut Design Space subtracts 1/4 inch from each side of the cutting mat. The maximum size for images to be printed and then trimmed is 9.25 inches by 6.75 inches so that the Cricut has room to put the registration marks around the picture that indicate where to cut when the image is generated from your home printer.
The maximum size for cutting on the Cricut Joy is 4.25 inches by 11.75 inches if you use mats because the Joy is smaller.
You can reduce your image to fit within the dimension specified in error, or you can create what is commonly referred to as a Larger Than Mat project to fix these issues. To accomplish this, you must divide the image into pieces that will fit within the cutting dimensions.
4. Machine or Accessory Compatibility
You might be seeing additional error messages due to problems with the Cricut machine or accessory compatibility.
For instance, if you try to complete a Print-Then-Cut project using the Joy, you would see this error because the Joy lacks the scanning feature needed to align the cuts with a printed image.
You will receive a warning if you use the Explore or Joy machine and a pre-designed project from Cricut Design Space that calls for the knife blade, rotary tool, or perforation blade. It is because the Cricut Maker is the only device that can use these unique accessories.
I hope I have helped you troubleshoot your Cricut Design Space. The lesson here is; that you first read the manual and followed the steps to work smoothly with Cricut Design Space.
Have fun designing your vinyl projects and don't forget to share it with us!
Social Media Accounts:
FB: CraftVinyl.ca
IG: CraftVinyl.ca
TikTok: craftvinyl.ca
For your vinyl crafting needs, please check our website at www.craftvinyl.ca. We offer different Adhesive and Heat Transfer Vinyl, perfect for your next project.
Other vinyl crafting articles for you. Please click the links below:
GUIDE TO BUYING ADHESIVE VINYL VS. HEAT TRANSFER VINYL
CRICUT SVG : CRAFTER IMAGERY FRIEND


