


Heat Transfer Vinyl on a Cork Board

Applying Heat Transfer Vinyl on a Cork Board
With school starting, one of the best ways to motivate yourself to study and work harder is to have beautiful things around you. In this article, we will turn a basic-looking cork board into something more cute and adorable by applying Heat Transfer Vinyl! Like customized school supplies or DIY room decorations that may help you focus and study more.
Yes, we can use Heat Transfer Vinyl with cork material. Cork can resist a build-up of heat, making it a possible substrate for a heat transfer vinyl project.
Here are some things we would like to discuss before starting with the process:
When pressing the heat transfer vinyl onto the cork board, you can use a heat press, mini irons, and a household iron. Most of the time, using a household iron is the best tool when crafting with cork boards. This is because using a household iron could give us better control over the areas we will press. But using a heat press is fine as well! Just make sure that every area of the design is getting enough heat. You can do this by turning the corkboard around.
When using a household iron, use the “cotton setting”. Set the temperature to 315 degrees and press the heat transfer vinyl for about 15-30 seconds. And also, put firm pressure when pressing the vinyl.
We would also recommend having something that will protect the cork board in case the heat is too much for the substrate. We can use a Teflon sheet and put it on top of the cork board and design before pressing. If you don’t have a Teflon sheet, you can use parchment paper or baking paper as an alternative for Teflon sheets.
Now that those are clear let’s start!
Step 1: Prepare the design.
After choosing the design, we want to put it onto our cork board, take the measurements of your cork board and then size the design into your desired size. When satisfied with the sizing of the design, we can now proceed to the next step.
Step 2: Place the Heat Transfer Vinyl into the Cutting Mat
When placing the heat transfer vinyl into the cutting mat, ensure that the shiny side is facing down. A heat transfer vinyl has a carrier sheet we don’t want to cut into, so we are placing it shiny-side facing down.

Use an application tool and burnish the heat transfer vinyl down into the cutting mat to ensure it’s stuck and will not move around when we load it into the cutting machine.

Step 3: Mirror the Design
Before sending the design to cut, make sure to mirror the design. Since we are placing the heat transfer vinyl into the cutting mat shiny-side facing down, mirroring the design will ensure that you cut the HTV correctly.

Now, we can finally send the design to cut. When you are finished with decal cutting, check a small corner of the design before pressing the unload button and see if it cut properly. If not, press the start button again, and the cutting machine will cut the material again.
Step 4: Weed the Design
Now is the time to weed! Using a sharp and strong weeding tool will make your weeding experience a lot easier! Weeding is when we remove the parts that are not included in your design, like the negative spaces or areas around.

Step 5: Prepare the substrate.
We can pre-heat the corkboard area where we’ll put the design. Pre-heating will help us with the application of the heat transfer vinyl later.

Step 6: Apply the Decal to the Substrate
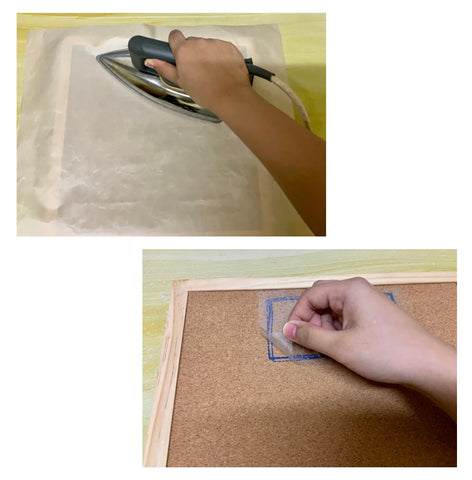
We’ll place the design where we want it to be. We’ll take our time on this step to ensure that the design is aligned and placed like we want it to be. Once we know the decal’s placement, grab a Teflon sheet and cover the design and substrate.

If the design is larger than the heat press or iron could cover, press the design into sections. Do this until all of the areas on your design are pressed. Press the first section for about 10 to 15 seconds, then proceed into the next section and do the same procedure.
(Do NOT slide the iron like when you are ironing clothes. Sliding the iron might cause the decal to shift or move and ruin the alignment of your design.)
To ensure the design has adhered to the substrate:
- Check a small corner of the design and peel off the carrier sheet. If the heat transfer vinyl comes up with the carrier sheet, it would need more heat.
- Press it again in sections for another 10-15 seconds.
- Recheck the small corner.
Step 7: Remove the Carrier Sheet
Before removing the carrier sheet, we recommend letting it sit first and cool down. This is to ensure that the Heat Transfer Vinyl adhesive is completely set into the substrate. Burnishing it with an application tool can also help ensure it is completely stuck on the corkboard.
Once it’s completely cooled down, we can carefully remove the design’s carrier sheet.

And we’re all done! We now have an adorable corkboard that we can use to decorate our room and help us to be in a good mood to study. This article would also be helpful if you’re trying to customize a cork coaster.

We hope that you’d find these articles helpful! If you ever try this project, we’d love to see them. You can send us a picture of your attempt at this craft thru our private message on our social media accounts. Or, if you have a question, you can also send us your message, and we’ll try our best to answer all of them!
Looking for Specialty Heat Transfer Vinyl?
FB: CraftVinyl.ca
IG: CraftVinyl.ca
TikTok: craftvinyl.ca
And if you need more crafting supplies like heat transfer vinyl and adhesive vinyl, check out our online store, www.CraftVinyl.ca. Thank you, stay safe and crafty, Crafters!


