


HOW TO LAYER HTV PERFECTLY!
HOW TO LAYER HEAT TRANSFER VINYL PERFECTLY!
Layering Heat Transfer Vinyl is a simple method to give more volume and color to your final substrate. But sometimes, layering HTV is tricky and complicated if you are just a first-timer. However, once you get comfortable layering your Heat Transfer Vinyl, you cannot escape it! So, let’s get right into it! In this article, you will learn the basics and tips on how to layer HTV properly!
STEP 1: DESIGN SET – UP
Prepare your chosen design and resize them according to your final substrate. If you are a beginner, we suggest you stick with designs with only four colors or less. This way, you will not be overwhelmed with working with layers. It will also make your work easier as you’re only a beginner. But, if your chosen design has more than four layers, don’t worry! Just follow these steps, and you will be fine!
Make sure also to mirror it before sending it to cut. Mirroring your design will help you achieve the right look for your design. It is because we will cut at the backside of the Heat Transfer Vinyl. We’ll explain it more in a while.
STEP 2: CHOOSING THE RIGHT HTV FOR YOUR DESIGN
Layering designs is one of the options for achieving a colorful project, but there are some HTVs that you can’t use when layering a design.
There are two classifications of HTVs; Regular HTVs and Special HTVs. Regular HTVs are the ones that are plain and smooth at the top, and there are no tiny details. While Special HTVs are heat transfer vinyl with special effects like glitter, sparkle, shine, and metallic. Glitter HTV, Flocked HTV, Metallic HTV, and others are examples of Special HTVs.
The Special HTVs are not meant for layering. You can not layer another HTV on top of these special HTVs. However, you can still use it as a top layer. If you want to use these kinds of HTVs, you must ensure they will be on the top layer of the design.
STEP 3: CUTTING YOUR DESIGN
When placing your Heat Transfer Vinyl, it is essential to put it on the cutting mat with the right side (shiny side) facing down. HTVs have a plastic carrier sheet on top of the vinyl you don’t want to cut into. That’s why you have to MIRROR your design!

Line the cutting mat up between the guides and send it to cut.

STEP 4: WEEDING OUT THE EXCESS PART
Once cutting is complete, it’s now time to weed out! Weeding means removing all the spare parts we do not want on our design.

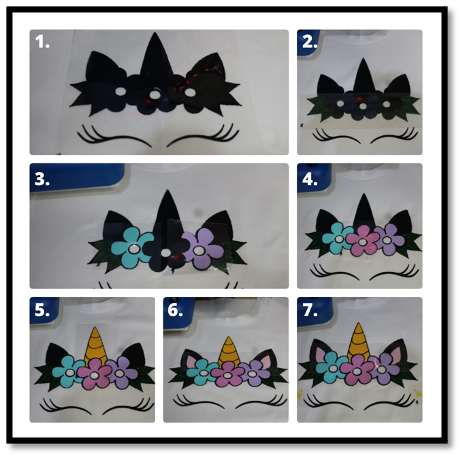
Repeat to all layers of your Heat Transfer Vinyl design.
It’s a good idea to put the layers of your design first before proceeding to the next step. It is to be sure you’ve cut everything out, and it fits together the way it would be.
Here’s another trick, you can write numbers on the carrier sheet of the HTVs. Write 1 on your first layer, 2 on the second layer, and up to the final layer. This way, you’ll not be confused and know what layer will go next!

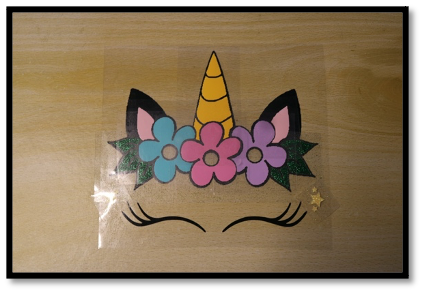
STEP 5: TRANSFER YOUR LAYERED DESIGN TO YOUR DECAL
First, pre-heat your heat press or household iron to the proper temperature. You can also pre-heat your final substrate by ironing it with your household iron or pressing it with your heat-press. Doing this will also remove the wrinkles in your final substrate.

Now, find the center of your final substrate. The easiest way is to fold your final substrate in half and connect both ends. Put a little crease on the fold using your heat press or household iron. When you open your final substrate, you’ll know exactly where the center is because of the crease. Also, use this method in your design. Now, connect and line up the wrinkles in your decal and design. And you now have a perfectly centered design!

The next step is applying the first layer of your design into your final substrate using a heat press or a household iron. Press the material into place with less time than you usually press it. For about 3-5 seconds. Remove the heat press or household iron and let it sit until it’s already warm. Test a small corner to ensure that it remains in place and if it’s already set, remove the plastic carrier sheet of the Heat Transfer Vinyl. It may not be completely set, but it will go into place as you continuously layer your design.
Then, please take the next layer and place it properly. Keep doing this process until every layer of your design is in place. Make sure that you’ll only press each layer for a short amount of time, which will help you avoid burnt marks on your design. When you’re done pressing all of the layers of your design, press it one last time for 3-5 seconds, this will make sure that all of your layers properly adhere to the final substrate.

Discover More Great Articles on Crafting
If you want to learn more about Heat Transfer Vinyl, click the links below:
TIPS AND TRICKS WHEN WORKING WITH HEAT TRANSFER VINYL PART1
Tips: You can also turn your garment inside out and give it a little press to help the design adhere better to your final substrate.
And there you have it! We have successfully layered our HTV! Layering HTVs can be pretty intimidating when you first think of it, but it’s super easy and so much fun!

We hope this was informative and helpful for you! Don’t forget to share this with your friends and family so they will also know how to layer HTV! Shop for your crafting materials like Heat Transfer Vinyl and Adhesive Vinyl in our shop! Share your future projects with us thru private messages on our social media accounts.
FB: CraftVinyl.ca
IG: CraftVinyl.ca
TikTok: craftvinyl.ca
Website: CraftVinyl.ca
Thank you, stay safe, and stay crafty, Crafters!


